Engine and transmission
1. Engine and transmission - I used the parts number list that is on this website and built up a parts list of all the seals in the engine. I researched a heap of websites that deal in Yamaha parts and decided upon www.partzilla.com for their ease of use, discounts, and transparent international shipping. Note: I did want to use an Australian company but could not find anything that had the diagrams, part numbers and ease of use like Partzilla. I ordered all the seals i could find along with a new con rod and bearings, clutch springs and plates, full gasket set and anything else i could find for this bike on their website. I went to the www.allballsracing.com website and ordered the main bearings and seals along with a heap of other bearings.
The transmission has a bunch of bearings in it and obviously gears etc.. A test ride of the bike will have to be done and hopefully there will be no problems. I will identify and replace all the transmission bearings while the engine is apart. Also, this will be a good time to examine the gearbox more closely for worn items.
The exhaust looks a little dinged and has repair welds on it. Its the original so will be the worse for wear. I thought about a DG pipe but the reviews were not that great so i sniffed around and ending up contacting Jon Easton at Jemco. He builds cone pipes and they have the reputation and look that i was after. I put an order in with Jon. Go to www.jemcoexhaust.com to check them out.
Ive decided to log what bearings and seals go where in the K and also what size or type they are and what the Yamaha part numbers are. Below are 5 pics of the cases with most of the information needed to help rebuild the engine on the K.
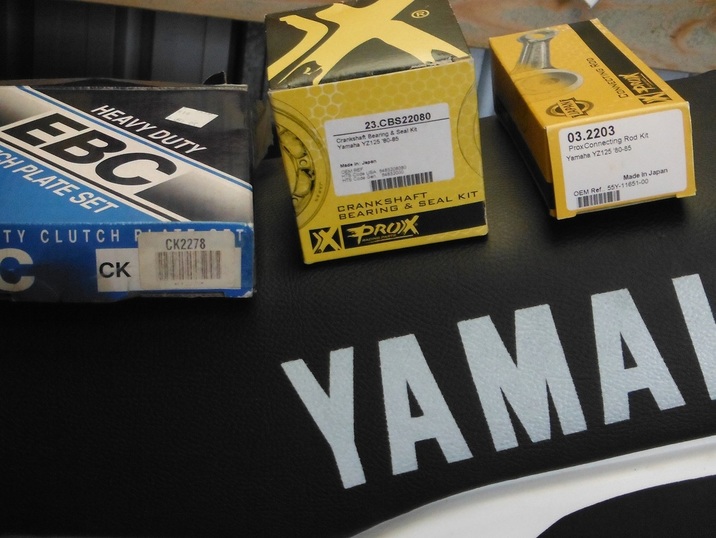
These are some of the parts and numbers you may need for your rebuild.
I had a lot of trouble with the original cases. The interference fit for the main bearings was loose. I ended up with 8 case halves and selected the best two to work with....
When i chose the two best ones i had out of the 8, i removed all the bearings and seals. I then used paint stripper to strip away 98% of the paint. When i was happy, i put them in my Bunnings home sand blaster and cleaned them right up. Then i washed them in detergent and used a compressor to blast away any remaining grit and to dry them. I then put them in the oven at 100C for an hour. During this time i got all my bearings ready for each side. I then inserted all the bearings using a combination of G clamps as presses and sockets to gently knock some into place. I used all my pictures of where each bearing goes as described previously in this post. Righto, all bearings in, so i put both case halves together, clean them with wax and grease remover then use my aluminum engine paint to give them a nice coat of silver as per the Lechien OW125. (i also had to do a lot of prepping and taping up). The cases looked great but to cure them they need to go in an oven at 100C for an hour. So, back into the oven to cure it all up...
When it was all cooled down, i took off all the masking tape and spent some time inserting the main seals. I will leave the other seals until i get it together.
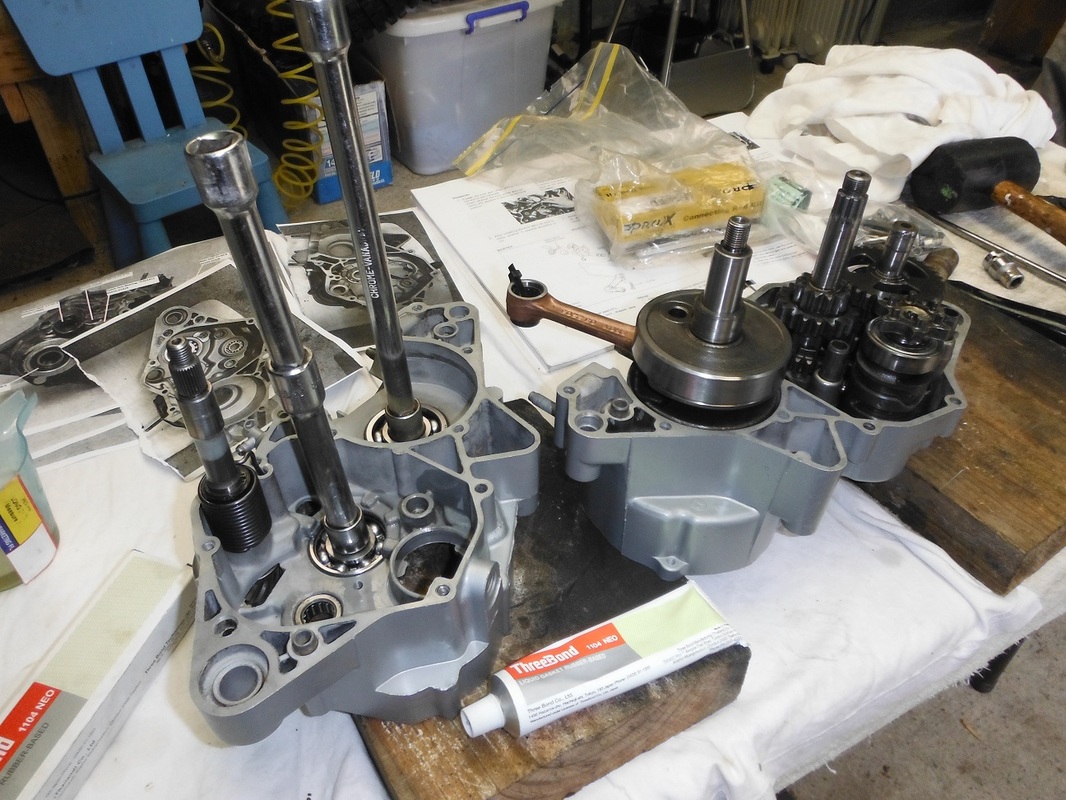
I checked all my pics, the manual etc, and installed my gearbox. I could run it through the various gears from 1st to 6th so i was happy it all went in OK. The next part i picked up on YouTube. To install the crank, i heated a socket on the stove and then put it in the main bearing. The heat transfer expands the bearing and the crank just falls into place. This went well and it just fell into position, no hammers, pullers or anything. When i was happy with the crank and gearbox, seals and everything, i prepared to join the halves. I used the same trick to heat the bearings in the opposite case so that it would just fall together. While the bearings were being heated, i slapped Three Bond on the cases as the gasket material. I then positioned everything up, made sure the dowels were in and then popped it all together... pic below of it all happening...
When i chose the two best ones i had out of the 8, i removed all the bearings and seals. I then used paint stripper to strip away 98% of the paint. When i was happy, i put them in my Bunnings home sand blaster and cleaned them right up. Then i washed them in detergent and used a compressor to blast away any remaining grit and to dry them. I then put them in the oven at 100C for an hour. During this time i got all my bearings ready for each side. I then inserted all the bearings using a combination of G clamps as presses and sockets to gently knock some into place. I used all my pictures of where each bearing goes as described previously in this post. Righto, all bearings in, so i put both case halves together, clean them with wax and grease remover then use my aluminum engine paint to give them a nice coat of silver as per the Lechien OW125. (i also had to do a lot of prepping and taping up). The cases looked great but to cure them they need to go in an oven at 100C for an hour. So, back into the oven to cure it all up...
When it was all cooled down, i took off all the masking tape and spent some time inserting the main seals. I will leave the other seals until i get it together.
I checked all my pics, the manual etc, and installed my gearbox. I could run it through the various gears from 1st to 6th so i was happy it all went in OK. The next part i picked up on YouTube. To install the crank, i heated a socket on the stove and then put it in the main bearing. The heat transfer expands the bearing and the crank just falls into place. This went well and it just fell into position, no hammers, pullers or anything. When i was happy with the crank and gearbox, seals and everything, i prepared to join the halves. I used the same trick to heat the bearings in the opposite case so that it would just fall together. While the bearings were being heated, i slapped Three Bond on the cases as the gasket material. I then positioned everything up, made sure the dowels were in and then popped it all together... pic below of it all happening...
It all slipped together easily... and i nipped everything up with the new engine bolt kit that i had bought.
This is where it all went wrong.............
When i nipped it all up and the cases were tight.... so was the crank. I loosened off the bolts and the crank loosened up. I tapped everything and had a play all to no avail. It all had to come apart again. I have another post in the forum on this subject, but what had happened was that when i had the crank rebuilt, it was rebuilt 1mm wider. This meant that it would get tight in the cases when you did the final nip up.
I took the crank back to the shop and they pulled it apart. It had been damaged previously so they were not able to use the thinner shims that had been supplied with the ProX rod kit. The shop machined the crank and put it all back together using Yamaha crank specs. Thanks to Witch Cycles for fixing the problem and not charging me any extra for machining etc..
Also, when i tried to remove the crank, it was really stuck in the cases. I *ucked up and belted it out and bent the tip of the shaft and damaged the threads where the rotor goes on. Before i gave it to the shop, i straightened the tip up and cut off the damaged threads. It came up like new so i got away with it just this once... The correct measurement for the width of the crank is 56mm.
Next up i fit the clutch arm shaft. This took an hour because it would not go in. I sanded the internal shaft, cleaned it all up and it fitted. There is a new bearing in there and i put the seal in before i fitted the shaft and tapped the retaining pin back in. I forgot to put the spring on but managed to work it over the shaft arm and into position because i could not get that retaining pin out again. When that was done, i fitted some gears and things and put the clutch back together with new springs and plates. I also put a new gear shift shaft in and tested it. Gears work well. Also fitted the 58mm Wiseco piston with a new small end bearing, ring and piston clips. The Wiseco piston was as new and the cylinder was in good condition and freshly honed so it is all being used again. On a side note, i have another cylinder, cylinder head and power valve that i sent to Eric Gorr at Forward Motion. They have resleeved the cylinder back to the original 56mm, matched the head, ported it and matched the power valve and then bead blasted the lot. This "works" top end will be going on later together with the new Wossner piston kit.
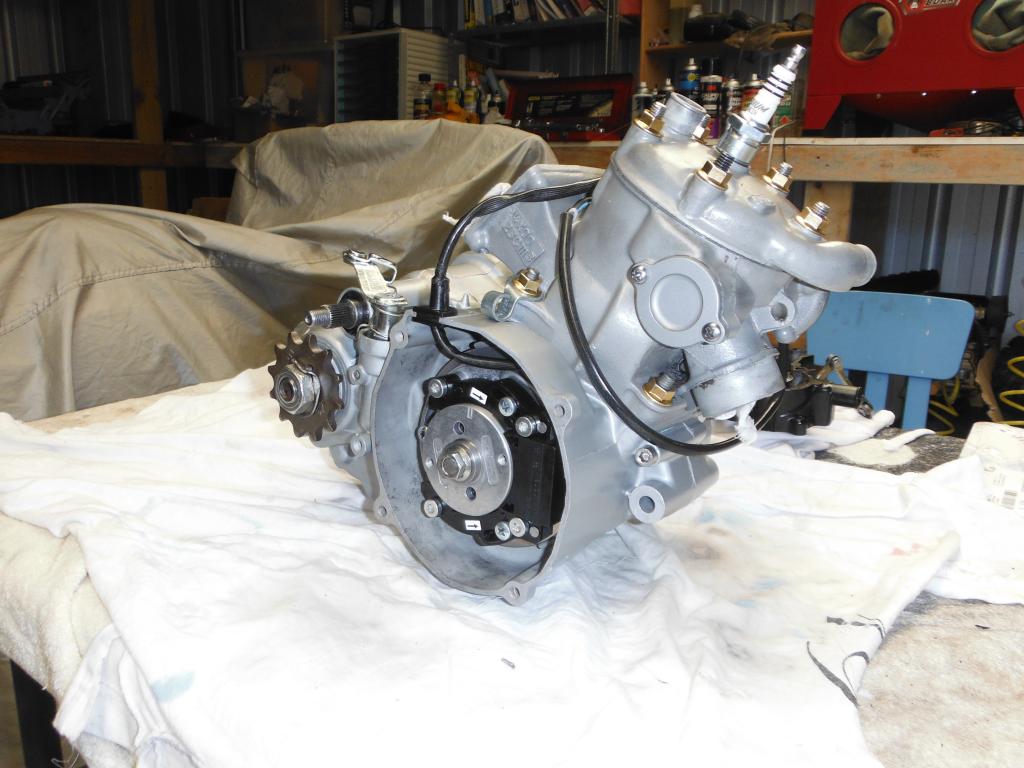
The cylinder, head, power valve and PVL ignition were fitted and torqued to the correct specs and then the timing was set on the bench using my home made dial gauge set at 1.2mm BTDC.
I used the old grommet from the original ignition and fitted to the new cable coming out of the right side case. I had to split it, then reseal the split with rubber cement. I then fitted the kick start and sprocket shaft seals. Next up was the new 12 tooth JT sprocket which was torqued up to spec and a new washer with a tab bent into place for safety. The engine is now ready for fitting.
This is where it all went wrong.............
When i nipped it all up and the cases were tight.... so was the crank. I loosened off the bolts and the crank loosened up. I tapped everything and had a play all to no avail. It all had to come apart again. I have another post in the forum on this subject, but what had happened was that when i had the crank rebuilt, it was rebuilt 1mm wider. This meant that it would get tight in the cases when you did the final nip up.
I took the crank back to the shop and they pulled it apart. It had been damaged previously so they were not able to use the thinner shims that had been supplied with the ProX rod kit. The shop machined the crank and put it all back together using Yamaha crank specs. Thanks to Witch Cycles for fixing the problem and not charging me any extra for machining etc..
Also, when i tried to remove the crank, it was really stuck in the cases. I *ucked up and belted it out and bent the tip of the shaft and damaged the threads where the rotor goes on. Before i gave it to the shop, i straightened the tip up and cut off the damaged threads. It came up like new so i got away with it just this once... The correct measurement for the width of the crank is 56mm.
Next up i fit the clutch arm shaft. This took an hour because it would not go in. I sanded the internal shaft, cleaned it all up and it fitted. There is a new bearing in there and i put the seal in before i fitted the shaft and tapped the retaining pin back in. I forgot to put the spring on but managed to work it over the shaft arm and into position because i could not get that retaining pin out again. When that was done, i fitted some gears and things and put the clutch back together with new springs and plates. I also put a new gear shift shaft in and tested it. Gears work well. Also fitted the 58mm Wiseco piston with a new small end bearing, ring and piston clips. The Wiseco piston was as new and the cylinder was in good condition and freshly honed so it is all being used again. On a side note, i have another cylinder, cylinder head and power valve that i sent to Eric Gorr at Forward Motion. They have resleeved the cylinder back to the original 56mm, matched the head, ported it and matched the power valve and then bead blasted the lot. This "works" top end will be going on later together with the new Wossner piston kit.
The cylinder, head, power valve and PVL ignition were fitted and torqued to the correct specs and then the timing was set on the bench using my home made dial gauge set at 1.2mm BTDC.
I used the old grommet from the original ignition and fitted to the new cable coming out of the right side case. I had to split it, then reseal the split with rubber cement. I then fitted the kick start and sprocket shaft seals. Next up was the new 12 tooth JT sprocket which was torqued up to spec and a new washer with a tab bent into place for safety. The engine is now ready for fitting.
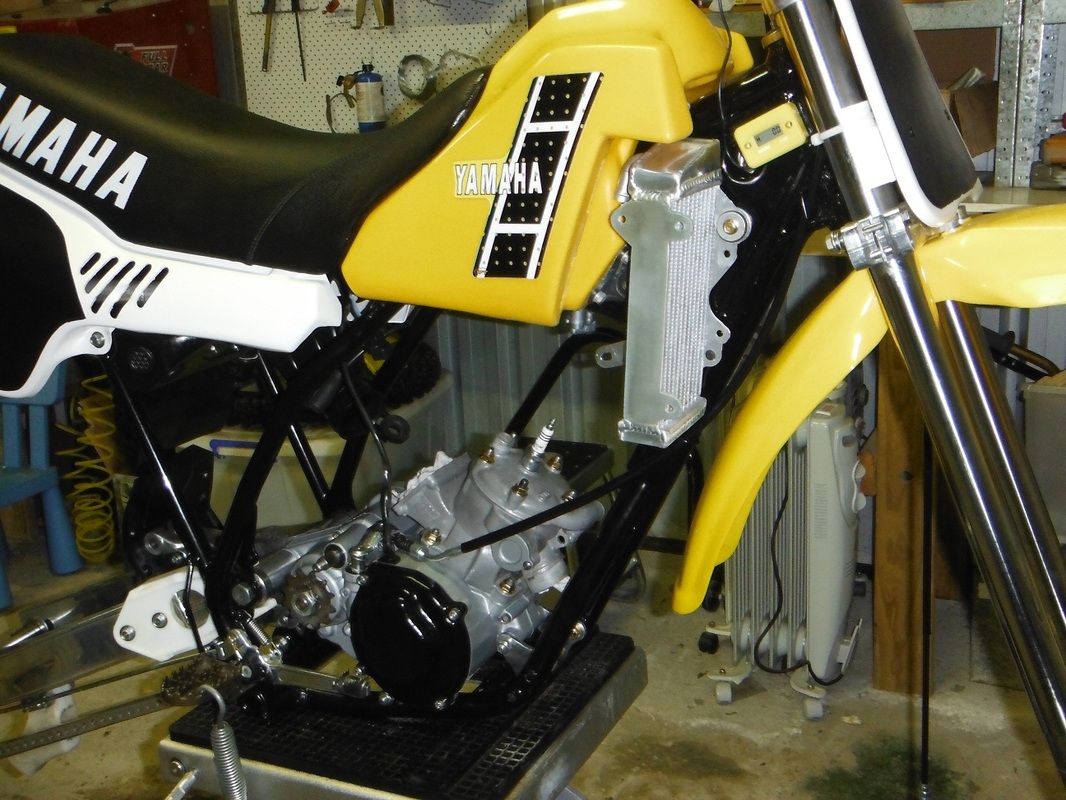
I cleaned up some engine mounting threads and filed some paint off the frame in preparation for engine fitment. The engine went straight in with no problems and i fitted up the polished engine bracket with new bolts. I then fitted up the ignition cover and clutch cable. I had to leave the clutch cover off before fitting the engine because you have to fit the clutch cable and then undo the lock nut on the clutch center and play around with the clutch centre rod and clutch shaft arm position. Thats all explained in the manual, which i constantly referred to in conjunction with all my pics i took.
After adjusting the clutch and doing a few other bits and pieces it was time to call it a day. Below is a pic of the fully rebuilt engine finally fitted into place...
After adjusting the clutch and doing a few other bits and pieces it was time to call it a day. Below is a pic of the fully rebuilt engine finally fitted into place...
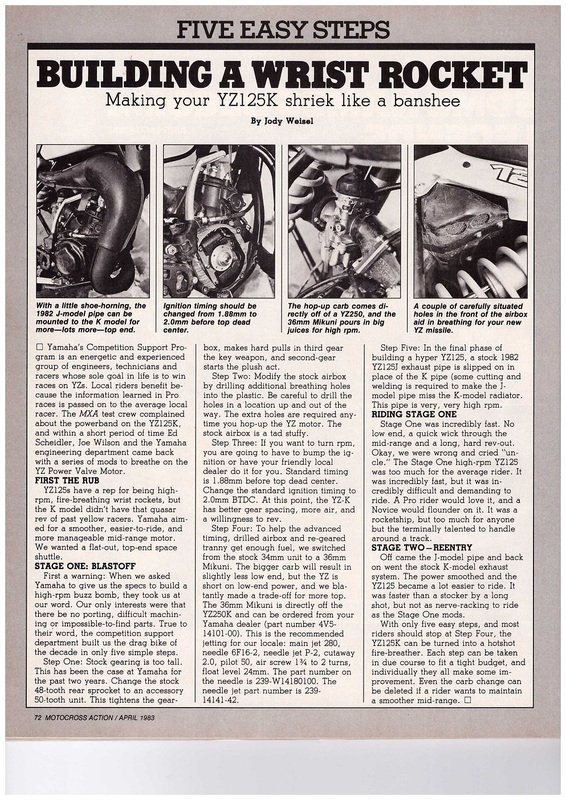
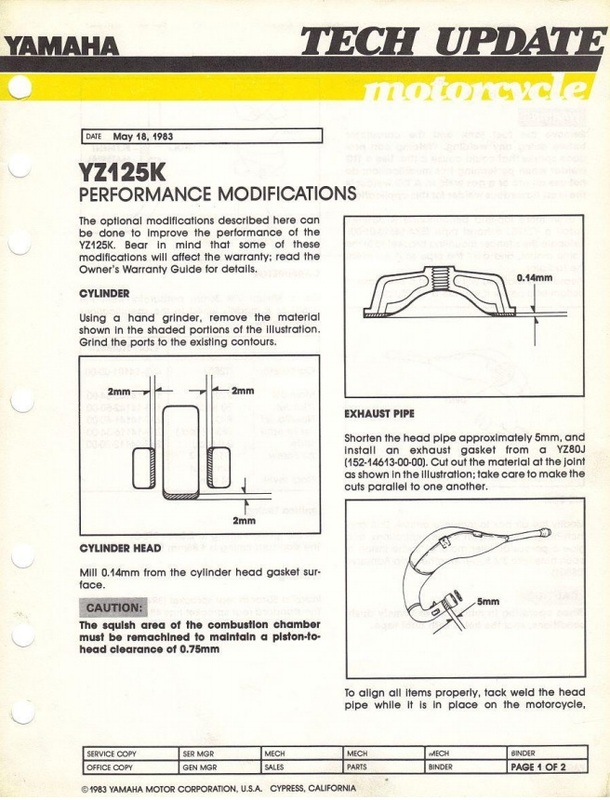
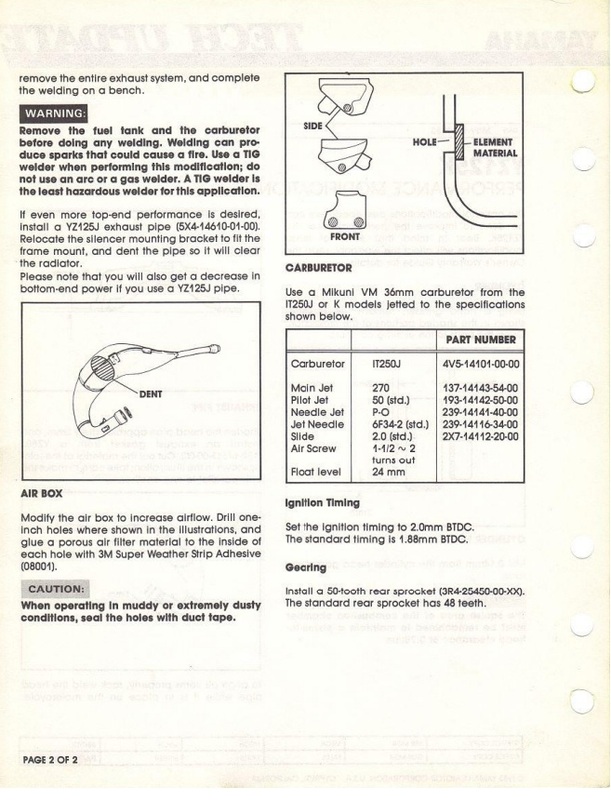
The engine is being built up using articles from MXA and the Yamaha Tech Report from 1983. The Motocross Action article came out in April and this was refined by the Yamaha race report in May. Idea's have been taken on porting, pipe, carb and airbox mods. The timing mod has been excluded as i have gone with a new digital PVL ignition that is set differently. Below are copies of the MXA and Yamaha articles...