Electrical
After contemplating various options, i decided on the digital version of the PVL system. It replaces the existing cdi, coil, wiring and stator and is a quality, modern replacement option for the 31 year old Yamaha system. Relatively easy to fit, i need to purchase a digital dial gauge on ebay and modify it using a spark plug thread so that it fits on the head. Once fitted, i can time the system to 1.2mm B.T.D.C. using the gauge.
I PM'd newmann on VitalMX.com and he got me a great buy on the PVL system including shipping to Australia. PVL ignitions can also be purchased from Penton at http://www.pentonracingproducts.com/pvl-ignitions.shtml.
The website describes the system thus: "PVL ignition systems have been designed with performance in mind. Its lightweight rotor reduces the amount of rotating mass on the crank, allowing the engine to reach higher RPM more quickly. By offering a higher output than most original equipment ignitions, the PVL ignition can burn more fuel, thus making more power. This higher kilovolt output, along with the system’s compact design, makes the PVL ignitions an ideal choice for replacement of failed OEM ignitions or as a performance accessory. PVL ignition systems are available for vintage to current model single & twin cylinder 2-stroke engines and small displacement 4-stroke engines. Systems are available in a fixed timing analog version suitable for all displacements, and a digital version for displacements under 200cc, which is programmed with a permanent advance/retard curve designed for uses where there is a lot of ranging in the engine’s RPM, such as in motocross."
The PVL system for my 1983 YZ125K is the 80115. It is the digital system with is programmed with an advance/retard curve. I hope this will provide the bike with a modern, trouble free electrical system for years to come.
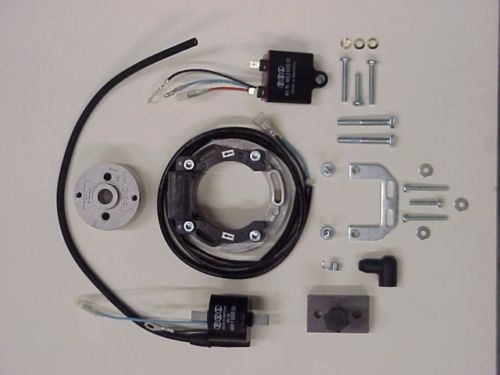
PVL for YZ125K Part 80115
To do this mod, you have to pull the old flywheel/rotor. You will need an 18mm x 1.5mm bolt which is hollowed and can be used as a puller. The one i got looks like this below. Mines a bit fancy but you can get simpler ones than this.
Once you have taken off the stator and rotor, you can fit the PVL system. First to go on is the 110mm adapter plate. The stator then goes onto the adapter plate and it doesnt matter how it is oriented as long as you set it up so that it is in the middle of its side to side adjustment range. Have a look at the stator above. It has 2 arrows. Which ever way the main shaft turns when the bike is going forward is used to select the arrow you will use for timing. (you want the arrow that goes in the same direction). There is a timing mark next to the correct arrow. What you have to do is set your timing to 1.2mm BTDC and then put the rotor on making sure that the timing mark on the rotor and the mark next to the correct arrow on the stator line up. Its that easy. I am making my own dial gauge using a cheap digital dial gauge and an old spark plug. You cut the plug down and drill it out then glue it over your dial gauge. You then have a custom 14mm dial gauge that you can screw into your cylinder head. Just find TDC, zero the gauge in then wind the engine in reverse so the piston goes down 1.2mm BTDC. That's when you can align your stator and rotor marks.
All the brackets and stuff are there to replace the coil and cdi as well. Should only take a few hours to have a totally new ignition system.
I have decided to use an iridium plug for the bike. The correct iridium plug is a BR9EIX. PVL recommends them as they have great reviews with people saying they are hard to foul and perform well.
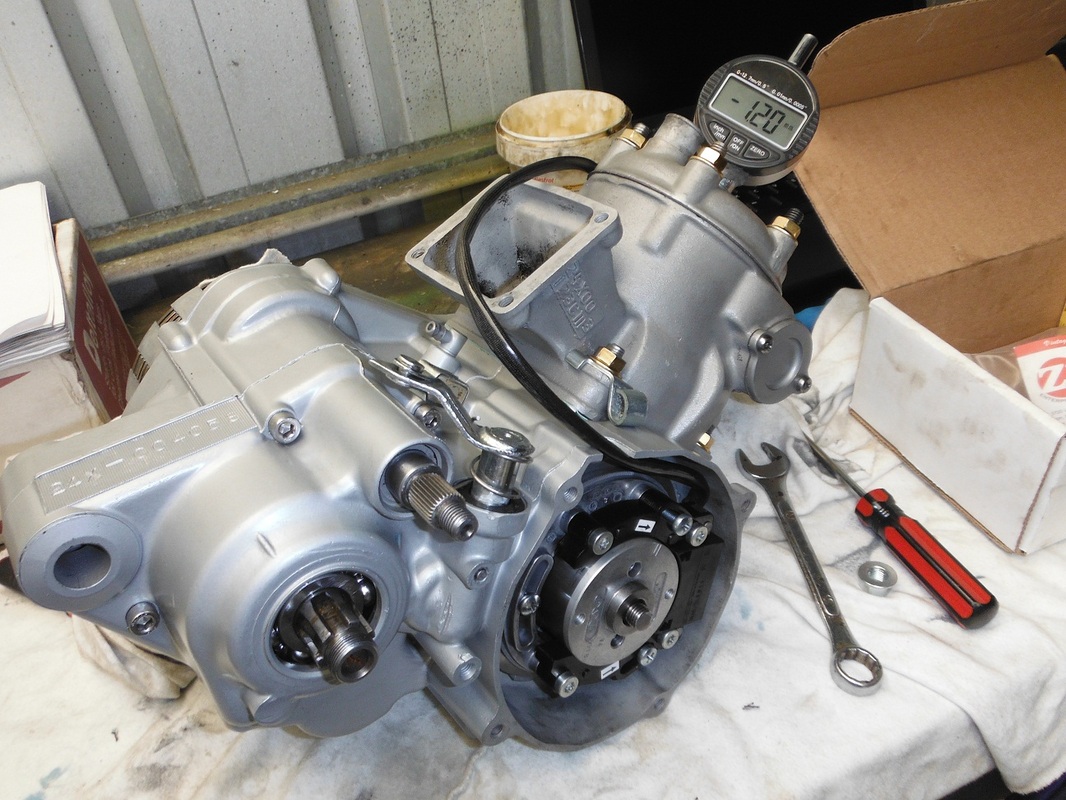
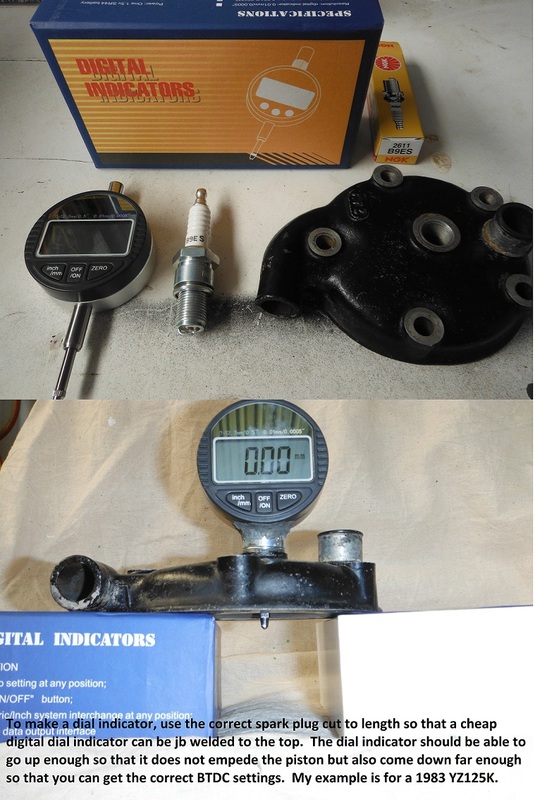
In preparation for the installation of the electrical system, i have made a simple dial indicator to do the timing on the YZ125K. Total cost about $20. I have a spare cylinder head for the K and used that as a template to see how far down into the head the spark plug protruded. Using that as a guide, i cut a spark plug down to the correct size so that the dial indicator could be jb welded to the plug. The indicator has to rise enough so that the piston wont jam it at TDC but also come down far enough to get the correct BTDC measurement. The PVL system is set to 1.2mm BTDC. Total time to make this tool was about 20 minutes.
Before the rebuild, i trial fitted the PVL and got the bike running. It ripped, so i was happy with the performance. During the rebuild, the PVL ignition was fitted and then the timing was set on the bench using my home made dial gauge set at 1.2mm BTDC. The coil and CDI were fitted to the frame and all wiring was connected and checked. I made an alloy backing plate for the CDI to help strengthen it when it was bolted to the tab where the original CDI was rubber mounted.